Evil Crawling Things Gear and Armor
Compare consumables, armor, and Backpack in the Gear shop. Choose what to buy based on whether you need to stun Crawlers, resupply, heal, or block damage.
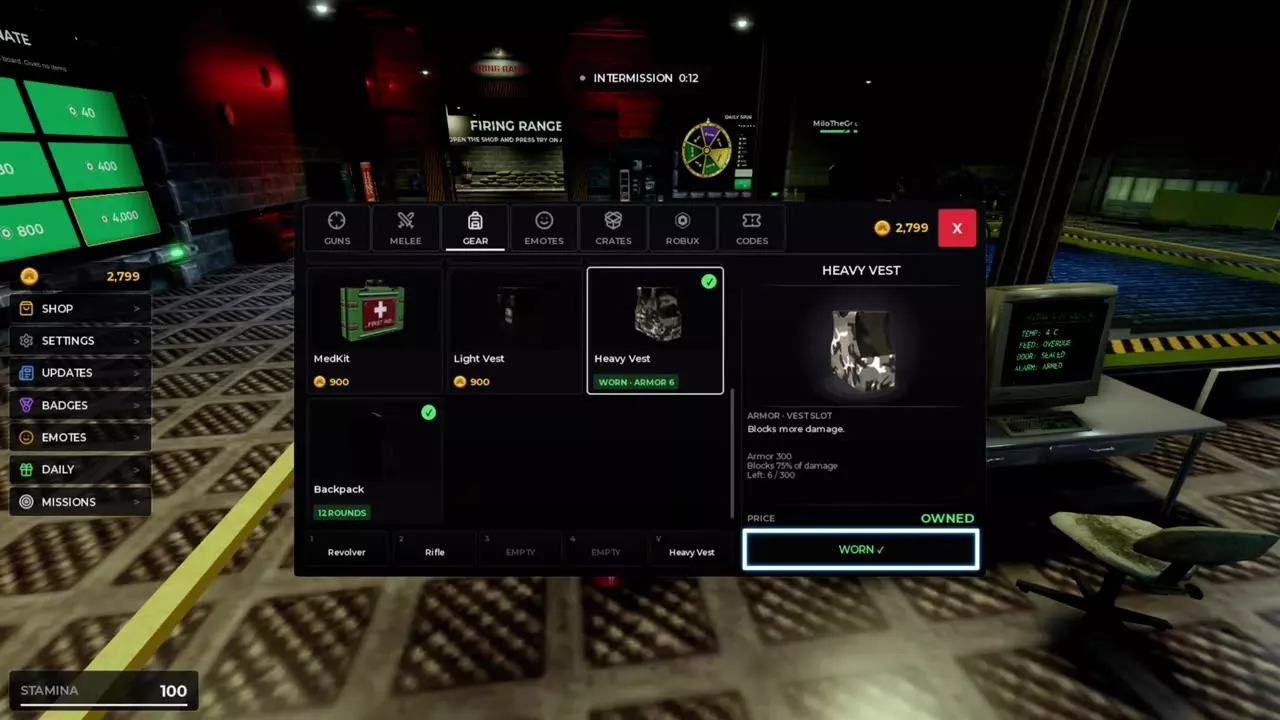
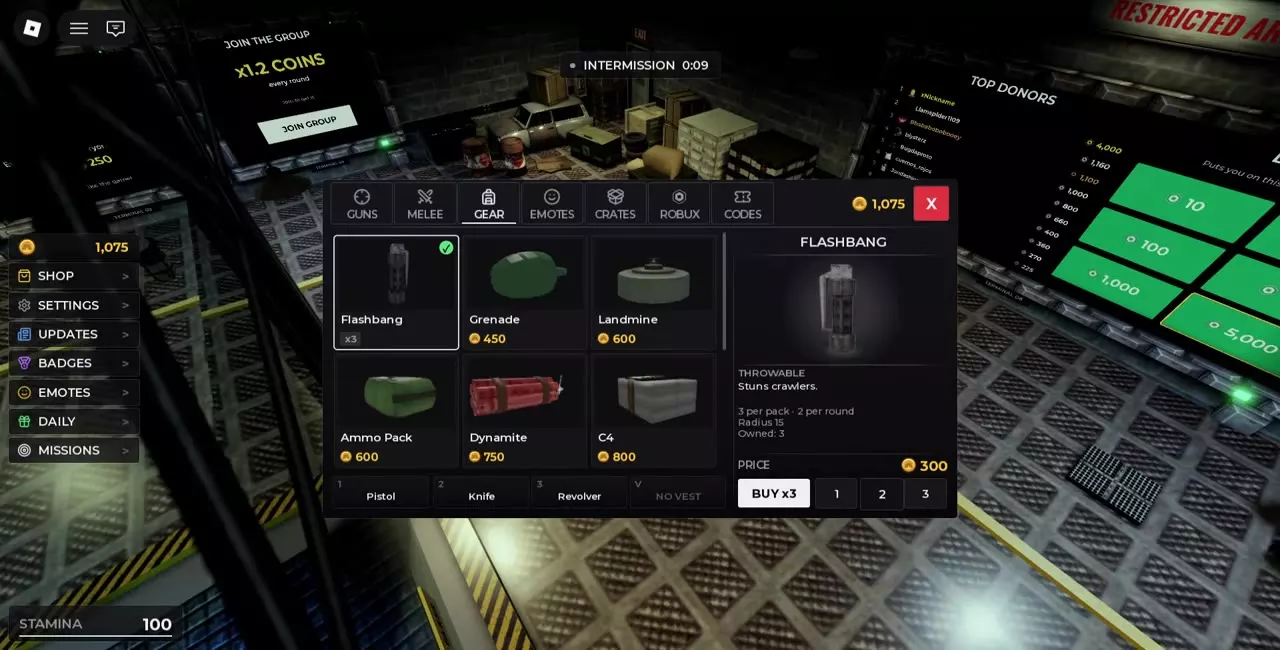
Open SHOP → GEAR between rounds. Flashbangs cost 300 Coins per pack of three, with up to two uses per round. Explosives cost 450–800 Coins, Ammo Pack costs 600, and MedKit and Light Vest each cost 900. Heavy Vest has 300 armor when full and blocks 75% of incoming damage while worn with armor remaining. It uses a dedicated Vest Slot. Scroll down near the vests to find Backpack.
Consumables, vests and loadout gear
The GEAR tab stocks a stun throwable, four explosives, ammunition and healing supplies, two vests, and Backpack. A consumable pack adds to your owned stock. The in-round counter tells you how many uses you have left in that round. Heavy Vest has its own slot and tracks remaining armor separately.
Gear directory
Use the price, type, and armor columns to find gear that fits your budget. Select an item name to expand its details, such as Flashbang pack size and stun radius or the Heavy Vest’s damage reduction.
Find Gear by its role and Coin price, then expand supplies, armor and equipment details.
10 objects
|
|
Stun throwable | 300 Coins Pack of 3 | — |
|---|---|---|---|
|
A throwable that stuns Crawlers within its area of effect.
TipsA 300-Coin purchase adds three Flashbangs to stock, and a round allows two uses. Use a stun opening to retreat or resume fire, then check the remaining count before relying on another throw. |
|||
|
|
Explosive | 450 Coins | — |
|
An explosive consumable sold in GEAR. |
|||
|
|
Explosive | 600 Coins | — |
|
An explosive mine sold in GEAR. |
|||
|
|
Ammunition supply | 600 Coins | — |
|
An ammunition supply item sold in GEAR. TipsFind Ammo Pack in SHOP → GEAR. Check the second ammunition number on your equipped gun to see how much reserve remains for reloading. |
|||
|
|
Explosive | 750 Coins | — |
|
An explosive consumable that you can carry in the hotbar. TipsSelect Dynamite to check the remaining count. When Out of Dynamite appears, switch to an equipped gun with ammunition ready. |
|||
|
|
Explosive | 800 Coins | — |
|
An explosive charge that you can carry in the hotbar. TipsCheck C4's remaining count when selecting it during HIDE or SURVIVE. Out of C4 means the selected supply has run out; switch to another equipped item. |
|||
|
|
Healing | 900 Coins | — |
|
A consumable medical kit that restores health during a round. TipsKeep a MedKit in a hotbar slot for injuries. After using it, watch both your health bar and remaining kit count; switch back to a weapon when the kit is spent. |
|||
|
|
— | 900 Coins | — |
|
A protective vest sold in GEAR. |
|||
|
|
— | — | 300 armor points At full armor |
|
A protective vest that blocks a share of incoming damage while worn. Its armor counter shows how much protection remains.
TipsCheck remaining armor before the next round: WORN confirms equipment, while 6/300 means only six armor points remain. After Heavy Vest broke, buy a replacement in GEAR and select WEAR. |
|||
|
|
— | — | — |
|
A piece of equipment listed in the Gear shop near the vests.
|
|||
Choose control, supplies or protection
- Stun Crawlers. Choose Flashbang when you need a brief opening to retreat or get back to firing. It stuns Crawlers within a radius of 15.
- Buy explosives on a budget. Grenade is the cheapest at 450 Coins. Landmine costs 600, Dynamite costs 750, and C4 costs 800. Choose Grenade if you want the lowest upfront cost.
- Resupply or heal. Choose the 600-Coin Ammo Pack for ammunition or the 900-Coin MedKit to restore health after taking damage.
- Protect against incoming hits. Light Vest costs 900 Coins. Heavy Vest has 300 armor at full capacity and blocks 75% of incoming damage while worn with armor remaining. Before the round, check the armor counter to see how much protection you have left.
Buy Gear and check its quantity
- Open SHOP between rounds and select GEAR.
- Select the item you want and check its Coin price and purchase button. For Flashbang, BUY x3 spends 300 Coins and adds three Flashbangs to your stock.
- Check the Owned count after buying. One pack brings it to three if you started with none. Flashbang has a two-use limit per round. Select it from your hotbar during the round to see how many throws you have left.
To find Backpack, scroll down in GEAR toward Light Vest and Heavy Vest. An owned Backpack entry shows 12 ROUNDS.
Use supplies and maintain armor
- Use the dedicated Vest Slot for Heavy Vest so your numbered hotbar slots stay available for weapons and supplies. For healing, item counters, and replacing broken armor, see Supplies and Vest Controls.
- For assigning or moving a consumable on your hotbar, see Equipment Slots and Reloading.
- If you’re deciding which gear to carry alongside your guns, compare weapon and supply combinations by budget and available slots.
Articles and guides
2Evil Crawling Things Supplies and Armor Guide
Use Flashbangs and MedKits in Evil Crawling Things, check C4, Dynamite, and reserve ammo, and learn how to equip or replace a Heavy Vest.
Evil Crawling Things Loadouts and Gun Choices
Build an Evil Crawling Things loadout around your Coins and hotbar slots. Compare starter handguns, SMGs, Rifle and shotgun pairings, and gear for stuns or healing.